
4 herramientas básicas de Stampin + 7 herramientas "más allá de lo básico"

¡Elige PAPEL DE LA SERIE DE DISEÑO con un 15% de descuento!
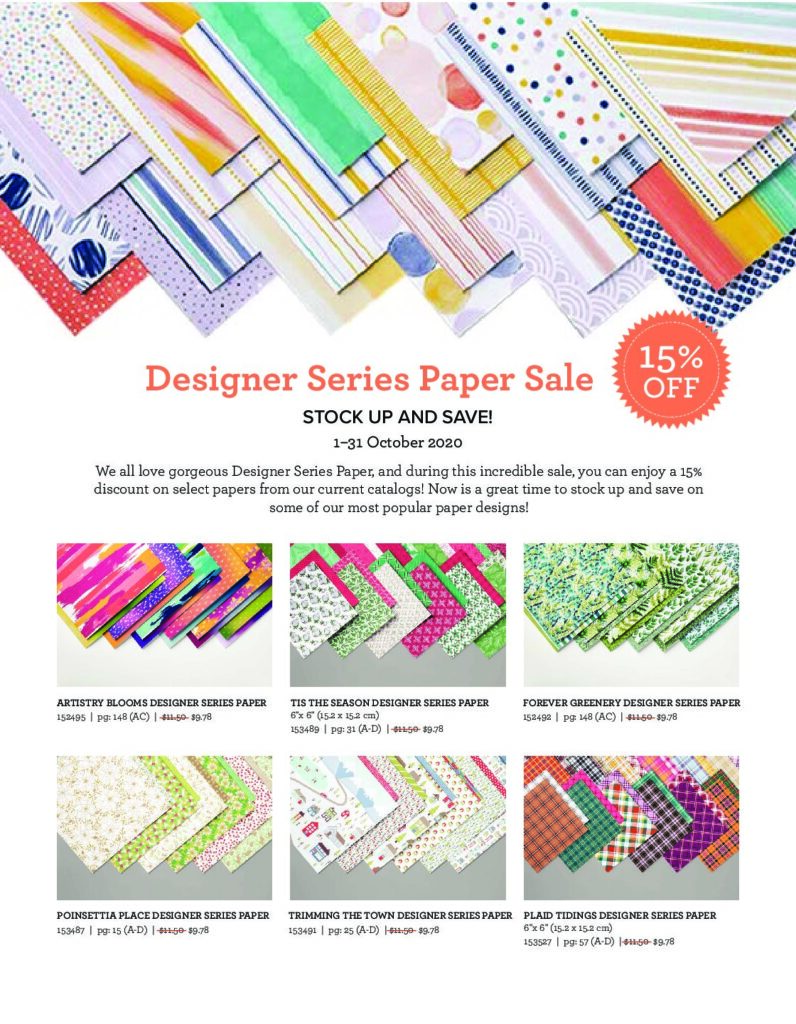

Stock up and save on some of our most popular patterned papers 1-31 October 2020!
Contact me or visit my online store during the month of October to receive your discount on select DSP! You don’t want to miss this!
Taza de café y portatazas de otoño mini


Hello, friends… I’m not sure what the weather is like where you are, but this past weekend here, autumn arrived! The cool, crisp air and sunny, blue skies are a welcome change from the dog days of summer! (I know we may have an “Indian Summer” before we’re finished, but I’m glad the seasons are turning).
I have started my fall decorating around the house and planted some “mums” out front. Ready for some favorite warm drinks… mulled apple cider, hot chocolate, or pumpkin spice latte! I’m not really a coffee drinker (I know, shocker, right?), but if ever there was a time to start getting into coffee, it would be in the fall with all of those tempting flavors!
Well, when I saw the Heartwarming Hugs Suite in Stampin’ Up!’s August-December 2020 Mini Catalog, I knew I had to have it to create some cozy little gifts for family and friends. The suite includes some Christmas-y Designer Series Paper and ribbons (and it DOES make very cute holiday gift ideas), but why wait until Christmas??! I decided to play with my Gilded Autumn Suite (from the same mini catalog) and made this cute autumn version!


Of course, the Heartwarming Hugs Suite includes the mini coffee cups and carrier (you get 8 cups with plastic lids and 8 kraft carriers). These can be purchased separately, too, not just as an entire suite. The Warm Hugs bundle includes the stamp set and the Warm Wraps dies – these dies cut out the pieces you’ll need for the wraps around the cups. I made my wraps from the Festive Felt Sheets (also from the same mini catalog) and added contrasting trim die-cut out of card stock. The dies also include shapes that coordinate with the images in the stamp set, so making the cute, layered tags was a breeze!

The Designer Series Paper (DSP) used on the cups as well as around the carrier are from the Gilded Autumn Specialty DSP pack (aren’t they yummy?), and I used card stocks that coordinate with the DSP. The little leaves are punched out with a set of 3 punches from the Beautiful Autumn Bundle, and the little Acorn Trinkets and ribbons used are also from the Gilded Autumn Suite as well. Aside from hot drinks, these adorable little cups could be filled with cold cider or even candies (candy corn, anyone?). Use your imagination!

Yes, indeed, count your blessings and I hope they overflow!!
Tarjeta "Tarro de girasoles"


I’m loving sunflowers right now! And I’m loving this card! The Jar of Flowers stamp set is so cute and versatile. The coordinating Jar punch makes it so easy to make a realistic looking jar (…and the Mason Jar Shaker Domes are so fun, but not used on this project)!


I started with a Very Vanilla card base and then added a layer of Soft Suede card stock, to which I have added texture with the Old World Paper 3D embossing folder. The next layer of the card is DSP that is cut out using a die from Stitched Rectangles. The DSP is from the retired Wood Textures pack, but you might find a good substitute in the current In Good Taste DSP, which I will include in the shopping list, below. Then, the ribbon that I added along the inside edge of the Soft Suede card stock layer is the retired Burlap Ribbon…but I only used this because I didn’t have the current Braided Linen Trim (which you can “unbraid” and pull apart a little bit).

Finally, for the focal point! I stamped the jar, water and stems onto Whisper White cardstock and punched this image out with the Jar punch. Next, I stamped the sunflower bouquet image 3 times onto Whisper White (yes, 3 times!). I fussy cut around the entire bouquet shape twice and then cut out the individual sunflowers on the third piece. {Did you ever make a decoupage shadow box? I think these were popular when I was a little girl and this reminds me of those.} I gave the fussy-cut flowers some shape using my bone folder, bending the petals up and making them more dimensional.

Now to bring it all together…After securing the ribbon ends onto the back of the Soft Suede layer, the layer is glued flat to the Very Vanilla card base. The die-cut rectangle is glued flat to the front of the Suede piece. Then, the punched jar piece and the first bouquet cut-out are also glued flat to the rectangle DSP. Next, using Stampin’ Dimensionals, position the next bouquet image right over the first, lining it up. The individual cut-out sunflowers each have a dimensional adhered to the back, and one has a second dimensional stacked on top of the first dimensional, so this flower will pop up a little higher than the rest. (I did use a leaf from the Celebrate Sunflowers stamp set with the flower that has “fallen” next to the jar).
Caja Mini Curvy Keepsake de Girasol


Isn’t this little box just the cutest?! Sunflowers just remind me of September. They are so bright and cheery…and they bring the birds around. I have gotten into the decorating fad that uses a tiered tray to display themed items and I change these items out almost monthly. I needed some sunflowers to fill my tiered trays this month. So, I’ve made this cute little box to fit the bill!

I knew that the Mini Curvy Keepsake Box would be just the right small size. I wanted to use a buffalo check plaid to make it have that farmhouse look that is so popular these days. I found in my “stash” of Designer Series Paper (DSP) – Stampin’ Up!’s name for their patterned papers – this Botanical Butterflies DSP from last year’s Sale-A-Bration event. (I’m sorry you can’t purchase it now, but you could easily substitute another paper for the box base).

Then, I stamped my sunflowers with Memento ink onto Whisper White Cardstock. This single sunflower comes from the Celebrate Sunflowers stamp set. I used Stampin’ Blends alcohol-based markers to color in the images. And I did not have the dies that coordinate with this set, so I just “fussy cut” around the image with Paper Snips scissors.

On this other side of the box, I stamped the sunflowers image from the Jar of Flowers stamp set and fussy cut this image out as well, after coloring with my Stampin’ Blends markers. After filling the box with some candy kisses (to give it some weight), I closed up the top by matching up the top handles and threading them through the slits on adjacent flaps (no adhesive needed for this box)! The flower embellishments are attached with Stampin’ Dimensionals. And, voila! My adorable little sunflower box is ready to display on my tiered trays!

So true. Don’t compare your progress to anyone else…we all have our own pace. As long as you have goals and are moving in the right direction, you are making progress!
Until next time, stay sweet and spicey!

Prized Peony

Are you a gardener? Do you enjoy cultivating prize-winning flowers that your fellow “green thumbs” envy? I enjoy dabbling in the dirt sometimes, but not right now, in the middle of the hottest time of the year. Instead, I enjoy making paper flowers! Today’s featured card is from Stampin’ Up!’s Peony Garden suite. The focal point on this card is not the stamp set, but rather the Peony dies. This set of dies cuts out several parts of the peony flower that fit together like a puzzle! It creates a 3D effect that makes the peony look as if it will jump off the card!

I have used the Prized Peony stamp set on the envelope and for the sentiments on the front and inside of the card, but it’s that gorgeous 3D flower that really takes center stage! You’ll notice that I used my dauber to add a little Petal Pink shading for more depth.

The Designer Series Paper (DSP) guided the color choices for this card. You’ll see a panel of the DSP on the card front, as a background. The Basic Gray and Gray Granite, paired with the Petal Pink, is very elegant. It really lets the peony draw all the attention.
And remember how I love to stamp a coordinating envelope to go with my cards! In this case, I used the peony images from the set, as well as some leaves, to give the envelope a botanical flair. Again, I used those daubers to add a little color (Petal Pink and Pear Pizzazz) to the outline images. And the sentiments are heat-embossed with Detail White embossing powder onto the Basic Gray accent piece and the Gray Granite inside panel.

 You may also notice that I’ve used some dies from Stitched So Sweetly for the shaped white piece that our peony is mounted on, as well as the stitched, scalloped gray rectangle that has our featured sentiment. Finishing touches are from a bit of Organdy Striped Ribbon in Petal Pink and from a few Elegant Faceted Gems.
Unfortunately, this card is for a sad occasion. However, my mother never sent fresh flowers to grieving friends because she didn’t want to send something that would also eventually fade and pass away. (Maybe a potted houseplant as an alternative). So, this paper flower can be treasured and bring comforting thoughts for years to come.

I hope you will try cultivating a paper flower garden of your own!